
Materials for 3d printing
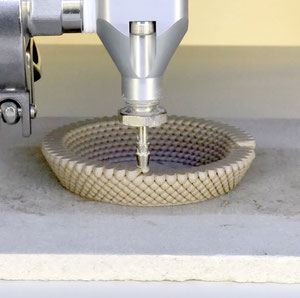
Our printers are perfect in printing a wide variety of materials, including clays, technical ceramics, porcelain, cements, and biomaterials. Printed objects from clay can be processed using standard ceramic techniques: dried, fired in a ceramic kiln, glazed if necessary, and fired again. Freshly printed pieces that have not yet dried can be smoothed, sculpted, cut, and joined - just like regular wet clay. It is recommended to perform these operations when the clay reaches a leather-hard stage, that happens few hours or one day after printing.
- Materials
- Extrudability and buildability
- Preparing clay for 3D printing
- How to load clay
- Clay/porcelain examples
- Other things that matter
Materials
Clay and porcelain are easy to extrude and print, and can be used without special additives. Good extrudability is achieved with a high content of fine clay particles. However, high particle dispersion also increases stickiness (high elasticity), which can cause the material to adhere to the nozzle. This may result in the nozzle dragging the printed layer, bending or tearing the walls of the object. This issue is more common when printing with porcelain and less so with clay. To mitigate these effects, it is recommended to avoid additives with anisometric (elongated) particles, such as paper or synthetic fibers, bentonite, and use grogged clays.
Clays containing grog (larger particles of pre-fired clay) are preferable. The grog makes the clay less sticky and the mix moves through the system better. The grog also gives a bit more structure to the mix to help printed forms standing up. Grogged clays dry more evenly and quicker. Printed objects retain their shape better upon drying and firing, and are subject to less shrinkage. Many suppliers indicate on the packet label how much grog there is in the clay [1]. A fine-grogged stoneware clay is a good starting point. Typical recommended grog particle sizes are 0.25 or 0.5 mm. The maximum particle size should not exceed one-quarter of the nozzle diameter being used. If natural clay is used, it should be sieved before printing to prevent nozzle clogging. In such cases, using a smaller nozzle diameter can help reduce material adhesion to the nozzle.
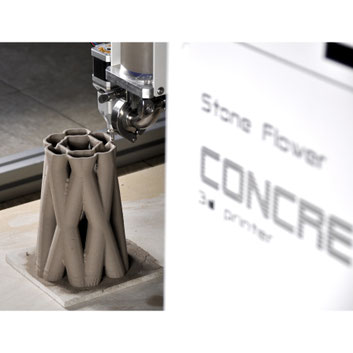
Concrete is a more complex material and is generally prone to separation under pressure. Standard concrete mixes used for casting walls or foundations are unsuitable for 3D printing. Special concrete formulations designed for 3D printing must be used, or high-dispersion components (such as fly ash or bentonite) must be added manually to prevent separation into heavy particles and water. On the other hand, aggregates larger than sand should be avoided (this does not apply to specialized concrete 3D printers). Due to its relatively low viscosity, concrete typically has good extrudability and can be printed through large nozzles (≥4 mm), provided the separation issue is resolved.
New materials often need to be optimized to achieve the required balance of extrudability and buildability. Below, we provide recommendations for testing and evaluating these properties.
Extrudability and buildability
Material for 3d printing have to have optimal reological properties: it must be viscous enough to hold shape but fluid enough to move through the system.
Extrudability
During the printing, the material is pressurized to approximately 2–4 atm inside the syringe. From there, it is pushed through a hose into the print head and then extruded through the nozzle. Extrudability testing in 3D printing, especially with clay or concrete, is all about evaluating how well a material flows through the nozzle and forms consistent layers.
1. Line Extrusion Test
Procedure: Extrude a single line of material at a constant speed and pressure. Observe the line for consistency, width, and smoothness.
Evaluation: A smooth, continuous line with uniform thickness indicates good extrudability. Gaps, bulges, or breaks suggest poor flow behavior.
2. Rheological Testing
Tools: Rheometer or viscometer.
Tests: Shear thinning behavior (important for materials like clay and concrete), yield stress, and viscosity curves. These help determine optimal extrusion speed and pressure.
3. Extrusion Force Measurement
Setup: Use a piston or screw-based extruder with a force sensor (electronic balance as an off-the-shelf option).
Goal: Identify the minimum force needed for continuous flow and compare across different mix compositions.
4. Nozzle Flow Rate Test
Method: Extrude for a fixed duration and weigh the output. Calculate flow rate (g/min or ml/min).
Use: Helps calibrate printer settings and detect clogging or inconsistent flow.
5. Visual and Image Analysis
Metrics: Line width variation, surface texture, and deformation or sagging.
Buildability
The ability of the printed material to support its own weight and the weight of subsequent layers without collapsing or deforming. Buildability is often measured by the maximum height a material can be printed before failure. It depends on how quickly the material gains strength after deposition.
How to Test Buildability
1. Layer Height Test
Evaluation: Measure the maximum number of layers or total height before structural failure (e.g., slumping, buckling).
Example: A mix with good buildability might reach 18 layers before collapsing.
2. Yield Stress Measurement
Method: Use a rheometer to measure static and dynamic yield stress.
Target Range: For concrete, values around 1000 Pa (static) and 550 Pa (dynamic) are considered suitable.
3. Time-Dependent Stability Test
Goal: Assess how the material behaves over time—does it stiffen too fast or slump before curing?
Insight: Buildability depends on the “printability window,” often between 15–35 minutes after mixing.
4. Geometric Sensitivity Test
Observation: Circular or filleted designs tend to have higher buildability due to better stress distribution.
5. Numerical Modeling
Parameters: Include printing speed, layer height, material density, and structuration rate.
6. Dropping Indenter Test
Relevance: Indicates mechanical strength and structuration rate, which are key to buildability.
Preparing clay for 3D printing
It’s best to use moist clay that’s already suitable for sculpting. However, packaged clay typically requires additional hydration — usually 5 to 15% by weight, depending on its initial moisture content and the desired consistency.
Factors affecting clay viscosity:
- Ambient temperature (add more water or eletave temperature in the cold environment)
- Humidity level
- Time since last mixing (clay under pressure tends to get notably more viscous within 1 - 3 days upon storage)
Recommended preparation process:
- Break the packaged clay into small pieces and place them in an airtight container.
- Add the required amount of water based on the clay’s weight.
- Lightly mix — by hand, with a spatula, or another tool — to distribute moisture evenly.
- Seal the container and let it sit for 12–24 hours. This allows the water to absorb and small air bubbles to dissolve.
- Mix the clay again using a large spatula or your hands, applying pressure and avoiding the formation of new air bubbles.
Optimal consistency: Clay loads into the extruder without excessive force, but does not slide into the tube without pressure. Aim for a consistency similar to sculpting clay — slightly more fluid, but still able to hold its shape.
How to load clay
Air bubbles can cause print defects or interruptions. Use pressing techniques or vacuum systems to minimize trapped air. There are several ways to load clay into the printer’s cartridge, avoiding air bubbles:

- By hand 1: Fill the tube with clay from one end, creating a rounded excess of clay above the edge of the tube. Add the clay in small portions, pressing it into the tube while always leaving some excess outside. You can add the clay by hand or using a spatula.
- By hand 2: Roll clay into cylinder slightly smaller than the tube’s diameter. Insert gently to avoid air pockets. All amount of the clay in this methond have the be loaded at once.
- Using a pug mill: A pressurized clay mixer that de-airs and extrudes clay directly into the tube. Sutigble for thick clay only.
- Wall-mounted extruder: Useful for larger batches.
4. Seal and Connect
Insert the plunger in the tube. There can be some air between plunger, and material, which will leak through the seal upon extrusion. Attach the tube to the printer’s adapter or
feed system.
Ensure the nozzle is clean and properly aligned. Clean the nozzle, if it contains some clay from the previous prints.
Clay/porcelain examples
White Porcelain Stoneware PF700
Ceradel White Stoneware CG811
Sio-2 Artemis White Stoneware 164-ARTE
Grolleg China Clay
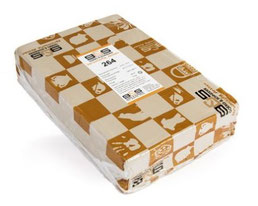
Goerg & Schneider Tonmasse 264
ANETO 3D White Porcelain
PRAI 3D White Stoneware
Other things that matter
Nozzle diameter:
Print bed:
Ventilation:
Drying:
[1] https://wikifactory.com/@jonathankeep/clay-for-3d-printing